Showing posts with label On The Grill. Show all posts

Friday, July 01, 2011

Tandoori Chicken Breasts with Mango-Mint Chutney

This recipe comes from my favorite grilling book, Weber's Way To Grill by Jamie Purviance. If you've ever wanted to learn to grill, get the book. It's fantastic!

Marinade
1 cup plain yogurt
3 Tbsp fresh lemon juice
1 Tbsp chopped garlic
1 Tbsp fresh ginger
2 tsp garam masala
2 tsp sea salt
1 tsp sweet paprika

4 boneless, skinless chicken breast halves, about 6 ounces each


Chutney
2 firm ripe mangoes, sides cut from pit
1/2 Tbsp vegetable oil
2 Tbsp finely chopped fresh mint
2 Tbsp cider vinegar
1/2 tsp granulated sugar
1/4 tsp kosher salt
1/4 tsp freshly ground black pepper

Vegetable oil

1. In a food processor (or my Vita-Mix) blend the marinade ingredients until uniform in consistency, adding 1 or 2 Tbsp of water, if needed (which I didn't). Place the chicken in a large, resealable plastic bag and pour in the marinade. Press the air out of the bag and seal it tightly. Turn the bag several times to distribute the marinade and refrigerate for at least 2 hours, turning occasionally.

2. Prepare the grill for direct cooking over medium heat.

3. Lightly brush the mango sides with the oil. Grill over direct medium heat, flat sides down, with the lid closed as much as possible, until they brown, about 2 minutes, without turning. Remove the mango from the grill, crosshatch the flesh in the skin, and scoop out the little pieces. In a small bowl combine the mango with the remaining chutney ingredients.

4. Remove the chicken from the bag and discard the marinade. Wipe off most the marinade clinging to the chicken and brush the chicken with oil. Grill over direct medium heat, with the lid closed as much as possible, until the meat is firm to the touch and no longer pink in the center, 8-12 minutes, turning once. Serve warm with the chutney.
To cut a mango: 

First, cut around the pit by rotating the mango so that the pit runs parallel to the blade of your knife. Cut each mango lengthwise along each side of the pit.
 Crosshatch the flesh without cutting through the skin, and scoop out the little pieces with a spoon.
Even if you're just putting the mangoes into a smoothie (which is delicious, by the way), this is by far the easiest way to cut a mango. Although, if I'm pureeing the mango anyway, I don't crosshatch- I just scoop.

Wednesday, June 22, 2011

Pepperoni Chicken Involtini


4 boneless, skinless chicken breast halves, about 8 ounces each
1 tsp. sea salt
1 tsp. granulated garlic
1/2 tsp freshly ground black pepper
1 tsp dried oregano
8 oz. sliced pepperoni
4 thin slices munster cheese
8 large basil leaves
8-16 baby spinach leaves


First, flatten the chicken breasts, smooth side down between two layers of plastic wrap. For very thick pieces of chicken, it helps to cut partially into the meat and fold it out.
 I use the flat side of a meat tenderizer to flatten the meat. You could also use the bottom of a heavy pan.
 Mix seasonings and sprinkle generously over each piece of meat.
 Load each piece of chicken with spinach, basil, 1 slice cheese and about 4 slices pepperoni
 Roll chicken lengthwise. Keep it as tight as you can!
 Tie each piece of chicken with 2 pieces of butcher's twine and brush the surface of each with olive oil. I didn't have any twine, so I simply used thread which worked just fine.
 Grill over direct medium heat for about 12 minutes or until the chicken is fully cooked and the cheese has melted. I turned my chicken every 2-3 minutes to keep it from burning.
 This would be great served with some good quality tomato sauce but we skipped the sauce so my girls would actually eat their dinner~ which the did. They loved it!

P.S. We sliced the leftover chicken and put it on sandwich rolls for some delicious sandwiches the next day. Yum!

Thursday, October 28, 2010

Aunt Bea's Portugese Pickled Pork Chops

Every year for Mike's birthday, I make him a special treat- it's a Portugese family tradition that he's had in his family for generations. And by treat, I mean something so amazing that I won't even eat them... That way there's more for him. Really. That's why I don't eat them... it has nothing to do with the fact that it's pickled meat... But really, I think this is a total MAN food. There's only a very few women that I've met that have liked these, but I don't think I've ever met a guy who didn't.

Aunt Bea's Portugese Pickled Pork Chops

1 galloon apple cider vinegar
2 rounded tbsp sea salt
1 1/2 tsp black pepper
1 can pickling spices
1 Tbsp minced garlic (I use one whole garlic bulb)
1 big onion, chopped (about 2 cups)
1 cup water
1 Tbsp paprika
1 Tbsp cayenne pepper
5-8 lb pork chops

Mix all ingredients in a large bowl. This will fit into two gallon-sized ziploc bags (just be sure to put the bags into a bowl to save your refrigerator from any leaks). Cover and marinate for 2 days, stirring from the bottom 2-3 times a day. Grill over high heat (450 - 500 F) for about 10 minutes, flipping once.

These are good straight off the grill, and (as Mike puts it) even better cold- so make sure you cook up enough to last a few days.

Thursday, August 19, 2010

Chicken Zucchini Bake

Here we are, another month gone by. My bedroom is making progress, although it's been slow this past couple of weeks. I've finished my quilt (I'll never make a king-sized quilt again! Holy cow!) painted the nightstands, purchased a headboard, made a few decorative pillows, and rearranged furniture. Now all I need to do is paint and put it all together. The problem with painting is that I spent all the rest of my grocery money last month on... well, groceries! Since I've been trying to cut back and pay for all my improvements out of the grocery budget that means painting will have to wait until next pay day. Which is almost upon us, hooray!
Last night's dinner was a fun one for me to make. I just went into the kitchen and got creative! I started off making pizza crusts because my 5-year-old has been begging for pizza for the past week or so. But then, looking in the refrigerator and seeing all my eggs and zucchini staring back at me changed my mind about just a simple pizza. I was also feeling hot and icky yesterday so turning on the oven was the last thing I wanted to do. I made my dinner on the grill, but it would work in the oven as well. Here's what I made:

Chicken Zucchini Bake

1 prepared pizza crust recipe
1 Tbsp mustard powder
1 Tbsp honey
3/4 cup white sauce mix
3/4 cup water
4 cups sliced zucchini
1 large onion, sliced
2 Tbsp olive oil
1 bell pepper, chopped
2 cups cooked, shredded chicken breast meat (I used a pint jar that I'd bottled)
3 eggs
1/4 teaspoon salt
1/4 teaspoon ground black pepper
1 teaspoon dried basil
1/2 teaspoon dried oregano
2 cloves garlic
1/2 cup shredded mozzarella cheese

Preheat oven to 400 degrees F (175 degrees C) or preheat outdoor grill to 400 (med-high). Generously grease the inside of a large cast-iron skillet. Sprinkle about 1/4 cup course cornmeal all over skillet. Press the edges of the pizza dough into and up the sides of the pan to make a deep crust. Bake (or in my case, grill) for 12-15 minutes or until edges pull away cleanly from the sides. If you are grilling, the top will not fully brown so be sure not to overcook your crust. Meanwhile, chop and slice your vegetables.Place the zucchini and a few tablespoons of water into a saucepan over medium heat, cover, and bring to a boil. Reduce heat to medium-low, and cook the zucchini until tender, about 15 minutes. Drain and set the zucchini aside. Place the onion and pepper in a large skillet with butter over medium heat, and cook and stir until the onion is translucent, 5 to 8 minutes. Stir the cooked zucchini and chicken into the onion, and mix well. Let the mixture heat for about 5 minutes, stirring occasionally. Add water, mustard powder, honey and white sauce mix. Allow mixture to boil and thicken. Spread the zucchini mixture in an even layer over the crust. In a bowl, beat the eggs with salt, black pepper, basil, oregano, and garlic powder; pour the egg mixture over the zucchini. Sprinkle the cheese over the top. Turn oven to broil on HIGH. Place cast-iron pan into oven a couple inches from top broiler and allow to cook until eggs are set and cheese is browned. Allow to cool about 5 minutes before serving.

I know this recipe looks a little complicated and the ingredient list looks long but it really wasn't too bad. From start to finish (excluding making the pizza dough) this dinner took me less than 30 minutes.

Thursday, July 22, 2010

Grilled Veggies

I cooked some of these vegetables on the fire last night, but because we had SO much to cook, I threw several packages of veggies on the grill as well to save time. You can put just about any vegetable (or fruit) into these foil packets before grilling. I'll just tell you what I put into ours. They really turned out great!

Grilled Veggies

1 Tbsp butter
1/2 Tbsp Mrs. Dash type seasoning (I used Bragg)
1-2 potatoes, peeled and cut into chunks
about 5 asparagus spears
1 large carrot, cut into chunks
1 stalk of celery, cut into chunks
1/4 cup onion, cut into chunks
1/2 small zucchini, cut into large chunks
    (Summer squash cooks quickly so be sure to cut them bigger than the other vegetables)
1 Tbsp Miso

Cut a large piece of heavy duty aluminum foil. Arrange vegetables in the center of the foil. Be sure you have enough foil on either side of the vegetables to fold completely over vegetables so you can be sure to get a tight wrap. Sprinkle miso over vegetables followed by Mrs. Dash. Add a pat of butter to the top of the pile and fold foil over, completely enclosing vegetables in a tight package. Heat grill to about 500 F. Arrange foil packets in a single layer on grill and close lid. Grill 10 minutes. Turn packets and grill an additional 8-10 minutes. If wrapped tightly, vegetables will stay hot for up to an hour giving you plenty of time to finish cooking your meal before serving if necessary.

Grilled Lime & Pepper Chicken

I know you all are wishing you could live at my house about right now. It's ok to admit it, I hear it all the time. We don't always have meals like this one, but we were entertaining some guests yesterday so I had to show off my skills. You know how it is... :)

Grilled Lime & Pepper Chicken

Marinade

1/2 Tbsp ground pepper
1/4 cup Lime juice (juice from about 1 large lime)
1 clove minced garlic
1/4 cup finely diced chives
1/4 cup miso or soy sauce
2 Tbsp Olive Oil

6 boneless, skinless chicken breast halves

In a small bowl combine the marinade ingredients. Remove the tenders from the underside of each breast (save for another use). One at a time, place each breast, smooth side down, between 2 sheets of plastic wrap and pound to an even 1/4-inch thickness. Place chicken in a large zip-top bag and pour marinade into bag. Place bag in a bowl and allow to marinate in the refrigerator for about 20 minutes. Remove from refrigerator about 5 minutes before grilling. Prepare the grill for direct cooking over high heat. Brush the cooking grates clean. Grill the chicken, smooth side down with the lid closed as much as possible, until no longer pink, 3-4 minutes. Turn over and grill just to sear the surface, about 1 minute. Transfer the chicken to a serving platter or individual plates.

Fire Pit Salmon

This is one of my very favorite ways to eat salmon. It's so delicious!
Fire Pit Salmon

8 oz salmon fillet, 1/4 inch thick
2 Tbsp Miso (or soy sauce)
2 Tbsp fresh squeeed lime juice
about 1 Tbsp Lime or Lemon pepper

First of all you must make a large fire so you'll have plenty of hot coals at cooking time. It usually takes about 30 minutes for me to get my fire ready. About 10 minutes before cooking time, prepare salmon as follows: Sprinkle miso and lime juice all over both sides of salmon. Sprinkle lemon pepper all over both sides. Wrap fish tightly in heavy duty aluminum foil. When coals are ready (they should still be red hot but without flames) place the foil wrapped salmon on a bed of coals about 2-3 deep. Cook for 6 minutes, flip foil package (be sure to use heat proof gloves) and cook an additional 3-4 minutes.

Wednesday, July 14, 2010

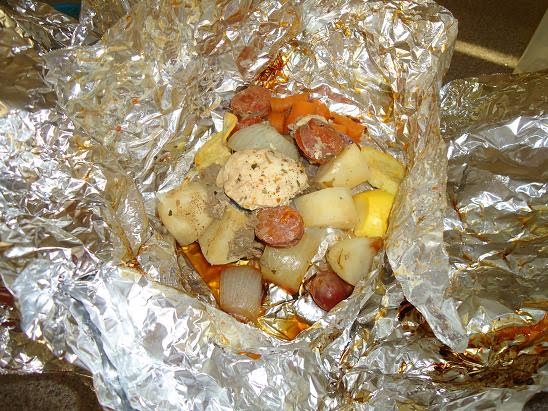
Hobo Dinners

This is not so much a recipe as it is an event. We invited some friends over the other night to share this one with us. We all had a great time and enjoyed some delicious food! My family loves it when we have Hobo dinners (aka Foil Dinners) because, of course, that means roasted marshmallows for dessert. Not to mention that they all get to "make their own dinner." My 15-year-old even got to start the fire!

Here's how it works...

Step One:  Start a big fire. (In a fire pit, not your kitchen please.)

Step Two:  Chop a variety of vegetables. There is no set thing that you must include, but here is what we used: onions, potatoes, peppers, asparagus, zucchini and yellow squash. We also used peas and carrots from the garden (yum!). You can add anything you like such as: spinach, corn on the cob, broccoli, etc..

Step Three: Chop one or two (or three) meats. We used ground beef, chicken and Linguica (Portugese sausage- the best!). I lightly marinated the chicken in some sesame oil and rice vinegar just a few minutes before assembling the meals.

Step Four:  Grab an assortment of spices and sauces. We used Bragg (like soy sauce), Tapatio (hot sauce), pepper, Mrs. Dash type seasoning and Montreal Steak Seasoning. I also got out some butter to add to any meals if necessary.

Step Five:  Assemble meals in Heavy Duty Aluminum foil. Let each person assemble their own if desired. Make sure not to overfill and wrap foil tightly so juices don't spill out onto the fire. You can write names onto the foil to easily identify each meal once cooked.

Step Six:  Break up your fire, getting a nice big pile of hot (not flaming) coals. Set the meals directly onto hot coals in a single layer.

Step Seven:  Cook for about 15 minutes, turning once. Check each meal for doneness before serving. If the potatoes and carrots are soft, the rest of the meal (including meat) should be fully cooked.

Step Eight:  Dump onto a plate or eat straight from the foil. Recycle your foil when you are finished.

Saturday, July 10, 2010

Chicken Paillards

These little beauties grill up super fast so make sure the rest of your meal is ready or close to ready by the time you take the meat to the grill. We had this for a simple meal a few nights ago. I served the chicken with some angel-hair pasta seasoned with butter, my home-made pesto, diced tomatoes and peppers. Also, the leftover chicken made some awesome grilled chicken sandwiches for Mike to take to work with him this week. I just topped a home-made roll with chicken breast, lettuce and tomato.


Chicken Paillards

Rub
1/2 Tbsp ground fennel seed
1 tsp salt
1/2 tsp garlic powder
1/2 tsp ground pepper
1/2 Tbsp. dried parsley flakes

6 boneless, skinless chicken breast halves
Olive Oil

In a small bowl combine the rub ingredients. Remove the tenders from the underside of each breast (save for another use). One at a time, place each breast, smooth side down, between 2 sheets of plastic wrap and pound to an even 1/4-inch thickness. Lightly brush the chicken with oil and season both sides with the rub. Prepare the grill for direct cooking over high heat. Brush the cooking grates clean. Grill the chicken, smooth side down with the lid closed as much as possible, until no longer pink, 3-4 minutes. Turn over and grill just to sear the surface, about 1 minute. Transfer the chicken to a serving platter or individual plates.

Sunday, June 27, 2010

"Outside In" Burgers aka Juicy Lucy


Again, it was too hot to cook inside yesterday. I asked the boys what we should grill: "Hamburgers. Like the ones on Man Vs. Food." Ok, so I'm thinking I can do that. I'll just grill me up a turkey burger to go along with dinner so I don't feel too deprived when all the boys are scarfing down Juicy Lucys... um, yeah.. that totally didn't happen. One look at those burgers coming off the grill and I couldn't help myself! There never was a turkey burger that was as juicy and delicious as these babies! One day of fattening food isn't going to ruin everything... right?

"Outside In" Burgers

2 lb ground chuck
1/4 cup chicken broth (I used vegetable broth from the veggies I cooked earlier that day)
1/4 cup fine bread crumbs
1 tsp salt
1/2 tsp pepper
4 oz American cheese

Mix ground beef with broth, bread crumbs and seasonings until well combined. Shape into 8 patties. Pile 1/2 oz cheese on top of each burger.
Shape meat around cheese, fully enclosing cheese inside of burgers. Preheat grill to 500 F. Brush cooking grates clean. Grill 8-10 minutes, flipping burgers once when they come away easily from the cooking grates. During last minute of grilling, toast buns if desired.
Mike wanted bacon on top of his burger, so we added some bacon to the grill as well. This, in my opinion, is the best way to cook bacon seeing as it doesn't force everybody in the house to smell bacon for the next 24 hours.
Here's Mike's partially eaten burger.. so messy he should be eating it with a fork (which he didn't, of course). He topped it with bacon, lettuce, tomato, bleu cheese dressing, ketchup, mustard and salsa.  Yum! Mike tells me this concoction was a total of only 80 calories... right...

And lastly, a close up of the cheese oozing out of the center of the burger.

Saturday, June 26, 2010

Gilled Pizzas

This was a really fun way to make pizza without heating up our house. In fact, it turned into more than just dinner- but a family activity. I used the leftover vegetables from the kabobs the other night for our topping as well as some sliced linguica and some turkey sausage (Portugese sausage- it's a delicacy around here!) I had the vegetables all chopped up and ready to go as well as the sauce, meat and cheese so as the crusts came off the grill, the kids were all able to do up their pizza just how they wanted it. For the dough, I used my 1 hour bread recipe cut in half. I also substituted whole wheat flour for half of the white flour.

Grilled Pizza

1/2 recipe One Hour White Bread
2 8 oz cans tomato sauce
4 cups chopped vegetables of your choice
  we used: tomatoes, peppers, onions, pineapple, mushrooms
2 cups chopped or sliced cooked meat
  we used: 1 cup sliced linguica, 1 cup diced turkey sausage
4 cups shredded mozzarella cheese

After the mixing and kneading stage of the One Hour bread recipe, move dough to a greased bowl (turning to coat all sides), cover and allow to rise for 25 minutes. When dough has doubled in size, cut the dough into 8 equal pieces. Lightly brush 8 squares of parchment paper with oil. (I didn't have any parchment paper, so I used freezer paper just to easily move my uncooked crusts around). Using your fingers or a small roller, flatten each piece of dough on a sheet of parchment paper to create 8 rounds. Each round should be about 1/3 in. thick. Lightly brush the tops with oil. Let the rounds sit at room temperature 5-10 minutes.

While dough is resting, pre-heat grill to 400 F. Brush cooking grates clean. Work with 2-4 rounds at a time depending on what can fit onto your grill (mine fits two). Remove dough from parchment paper, place the dough on the cooking grate and grill with lid closed as much as possible, until the dough is well marked and firm on the underside, 2-5 minutes. Rotate as needed for even cooking.

Transfer the crusts to a work surface with the grilled sides facing up. Repeat with the other rounds.

Spread the sauce evenly over the crusts, keeping it from the edges, and then arrange vegetables on top. Top with shredded cheese. Return pizzas to grill and cook, with lid closed as much as possible, until the cheese is melted and the bottom of the crusts are crisp, 2-5 minutes. Rotate pizzas occasionally for even cooking. Transfer to a cutting board and cut into wedges. Serve warm.

This recipe makes a LOT of pizza. You can easily turn this into 16 small pizzas or cut the recipe in half to still feed a family of 4-6. I made the recipe as is, except for with two of the crusts, I cooked both sides without adding any toppings. I then topped one of the fully cooked crusts with refried beans, salsa, shredded lettuce, cilantro, chopped tomatoes and avocados for my cheeseless (and delicous) alternative. The other crust is tucked away in the refrigerator for a quick lunch for me and the kids next week. We fed our entire family, plus an extra teenage boy and the neighbors dog with this meal. [My neighbor was talking to us outside while my 3-year-old was eating her pizza a litt too close to the dog! Whoops!] We also ended up with one extra pizza to serve for lunch today.

Lamb Meatballs, Fruit & Spinach Salad, Kabobs


I am getting so wussy in my old age. It's been so HOT in my house and the outside temps are only in the low 90's as of yet. Either way, the thought of turning on my oven is just about unbearable so we've been grilling the past few nights. I've enjoyed coming up with some different things to cook on the grill- afterall, we can't have steak and hamburgers every night that it's too hot to cook indoors.
In the process of cleaning out my freezer I found some lamb meat that I bought late last year on clearance and with a coupon. It came out to $1.50/lb so I figured it was worth a shot at that price. But, in all this time I've never known what to do with it. The other night I decided to turn it into some grilled meatballs.

Lamb Meatballs
2 lbs ground lamb
1 Tbsp. minced garlic
1 Tbsp. ground cumin
1 tsp kosher salt
1 tsp ground black pepper
olive oil
In a medium bowl, using yuor hands, gently mix the meatball ingredients. Do not overwork the mixture (like I did! I mixed the meat in a plastic bag so I wouldn't have to touch it, but I ended up over-working it that way...) or the meatballs will be tough. Makes about 25 meatballs Thread 5 meatballs onto each skewer. Lightly brush with oil. Pre-heat grill to about 400 F. Brush the cooking grates clean. Grill the meatballs with the lid closed as much as possible until they have browned but are still slightly pink in the center, 4-6 minutes, turning occasionally.

I also bought a pineapple and some peppers last Saturday at Costco that needed to be used. So, to go along with our meatballs, I made some pineapple/veggie kabobs and some Fruit & Spinach salad.

Fruit & Vegetable Kabobs
1/2 large onion
3-4 cups fresh pineapple chunks (1/2 pineapple)
1 red bell pepper, cut into chunks
1 orange bell pepper, cut into chunks
8 oz button mushrooms
2 cups tomatoes, cut into large chunks
or 18 plum tomatoes 
 If using bamboo instead of metal skewers be sure to soak them in water for at least 30 minutes. Thread vegetables onto skewers. Keep the vegetables close enough to just touch, without crowding. Brush with olive oil. Preheat grill to 400 F. Brush cooking grates clean. Grill with the lid closed as much as possible until skins of the vegetables begin to brown and blister - about 8 minutes- turning occasionally.

My last edition to our meal was an afterthought. I just wanted to use the extra pineapple and onions that didn't fit onto the kabobs, but it turned out really great! I made a Fruit and Spinach salad with Sesame Vinaigrette

 
Fruit & Spinach Salad

1/2 lb baby spinach
4 oz sliced strawberries
1 cup pineapple, cut into bite-sized pieces (if using canned, reserve the juice)
1/2 cup onion, cut into small chunks
1/4 cup chopped walnuts (optional)
1/2 cup Sesame Vinaigrette

Combine salad ingredients. Toss with Sesame Vinaigrette. Refrigerate at least 30 minutes to combine flavors.

Sesame Vinaigrette

4 teaspoons sesame seeds, toasted*

2 tablespoon rice vinegar
6 tablespoons unsweetened white grape juice (or use the reserved pineapple juice)
4 teaspoons sesame oil
 
Combine ingredients in a small jar. Shake to combine. Allow to sit for several hours if possible to combine flavors. Shake again before serving.
*I didn't have any sesame seeds, so I made my dressing without them and it still tasted great.
 
Overall, my opinion about lamb? I think I'll stick with ground beef and turkey. The guys seemed to like them (we only ended up with 4 leftover meatballs) but, while they were good, they don't top my list of favorites. Maybe it's because I kept conjuring images of a cute little fuzzy creature bleating and crying or maybe just because I overworked the meat and the meatballs turned out a bit tough. But at least now I can say I've tried cooking it, right?