Really when I started this blog I had great dreams of detailing menus and money saving tips as well as sharing receipts and food storage ideas... I had no idea how much time all of that would take, though- so this little project of mine has turned more into just another recipe blog.. oops, sorry! But for the most part, at least, these recipes are all fairly inexpensive and I hope I've been helping at least a little bit. For this post, I decided that I'll get back to basics a little bit and share some money saving tips like I originally intended. Then if I have time, I will add a couple more posts with the recipes I've made the past couple of days: Vegetarian Lasagna, Chicken and Broccoli Bake, The "good" Brownies.
Change your perspective and increase your knowledge. To be effective in your new spending plan, you must change your perspective and to do that you may need to learn a few things. Some will essentially be starting from scratch as far as grocery budgeting- others may just need a few pointers to continue down the right path. Either way, knowledge is the foundation of change. We need to open our minds to new information and ideas. What could you do with an extra $20 a week? How about $50.. Or even $100? No matter what your food budget, there are always ways to save. Here are some basic steps to save money on your groceries:
1. Find your motivation. Why do you want to save money? Chances are, in today’s economy you-like so many other families- are just trying to make ends meet. The grocery budget is one of the few expenses that is not “fixed” in a family budget- therefore it is a target to save some money. Even if you have the good fortune of not having to worry about the cost of your food, there is always something that we’d like to do with our money “if only we had a little more.” Find your purpose and focus on it!
2. Save your receipts. This allows you to track your expenses month to month so you can make adjustments where necessary. A lot of people I have talked to have had a vague idea of how much they spent on groceries, but usually forgot to count those extra little trips to the store for milk or a bag of chips when they say “I spent X amount of dollars on food.” Also, It allows you to identify and cut out the junk. If you realize how much money you have been spending on things like chips, cookies and any non-essential it makes it less of a temptation in the future. This also helps you to keep track of changing food prices and plan
accordingly.
3. Be aware of the cost of food. Keep a notebook of average prices for the items that you buy most often. I have made a list of all the things I buy each month. After each shopping trip, I come home, open my notebook, and record the price of each item that I bought. Again, saving your receipts will help you with this. I know when food prices are on the rise and I can also tell when it’s time to stock up on a deal. This way when something goes on sale, you know if it’s a good deal or not. Most stores will advertise a “sale” on an item just to move it though the store, even if the “sale” price is pennies less, or even the same, as the regular price.
4. Figure out the cost of your favorite recipes. Keeping track of food costs will help you figure out how much it costs to make things yourself. The $12 frozen lasagna is a lot less tempting when you know you can make it yourself for less than $5. But don’t throw out your expensive recipes. Most can be modified to use cheaper ingredients and save you a ton of money without changing the taste of the meal significantly, if at all. As I find meals that are cheap, I stick them into my folder so that I always have some inexpensive meal ideas at my fingertips.
5. Get your family on board by allowing them to contribute ideas. Make goals together . Reward yourself as well as your family. Let’s face it, change is never easy. We all have our habits that we hold on to-for good or bad. Remember that this will be a tough process, but it should also be rewarding. Be creative and look for ways you can give yourself and your family a metaphorical pat on the back. Money need not be involved! Take the kids to the park. Give yourself a nice warm bath with a good book. Stay up a little longer after the kids go to bed and give your spouse your undivided attention. Bottom line--enjoy life! Life is not about money-it’s about happiness.
6. Plan a menu for an entire month (or pay period). By organizing your menu and your meals in this way, it will allow you to plan your shopping for the entire month. This will also eliminate the “what’s for dinner” syndrome. This will also give you direction when watching the ads. Every month I know what I need to buy and I know what is not on that list. I won’t spend my precious extra money on something, even if it’s a fantastic sale, that we hardly use or need. It’s not a good deal if it goes to waste.
7. Make meals ahead of time. Time is money. We’ve all heard it and it’s true. Spending a little time now will save you a heap of money in the future. This step virtually eliminates impulsive eating out and will allow for more family time in the evening when everybody is home.
8. Buy in bulk and Compare prices. Bulk prices are not always the cheapest. Again, be aware of the cost of food and take the time to compare prices to make sure you’re getting the best deal. Cook and freeze portions needed for monthly dinners when you get home from shopping (or in the next day or two). This keeps kids from eating everything and keeps your food from spoiling in the refrigerator. Wasted food is money down the drain.
9. Make it yourself! Most things made from scratch really are cheaper than store-bought convenience foods. It’s also a healthier way to feed your family. When you make things yourself, you can avoid the added salt, fat and sugar- not to mention artificial flavors and colorings and who knows what else! You have more control over what junk your family is eating, or more importantly, what they are not. I have a mix for just about everything from hot chocolate, to stew, to pancakes, to sloppy Joes. By preparing these things ahead of time I find that I save a lot of time when cooking, and money too.
10. Get Organized! None of this will work if you don’t have a plan--a way to track what’s going in and out and what’s needed to buy. When you are running low on something in your pantry then you know it’s time to start really watching the ads for that item. Shop sales and bulk to replenish what you use. Keep a folder or some other way of keeping track of what you have. By setting up your pantry in this way, it allows you to use sale prices on almost everything that you put into your meals. What a difference!
11. Change your shopping habits and practice other cost cutting tips. . Use your own judgment and do what works for you and your family. While the previous steps will help you reduce your grocery budget, you may need a little extra help. Following are a few ideas that can further help you to cut costs.
Make a list and stick to it.
Only use cash to pay for your groceries.
Bring only enough CASH for what you plan to buy. If you come across a deal that is too good to pass up, come back for it.
Don’t throw away food - ANY of it!
*Re-use bacon grease for frying eggs, flavoring muffins, greasing tins, etc.
*Use juice from canned fruit as a marinade for meat or drink it yourself.
*Cut moldy cheese (white non-fuzzy mold only) off cheese block (hard cheese). The rest is fine to eat.
*Freeze leftovers for “TV dinners”.
*Return unsatisfactory products.
*Grind leftover salad and add to vegetable soup.
*Re-use leftovers in another meal.
*Save dry bread, heels, even the crumbs from cutting bread in freezer and use in recipes calling for bread crumbs.
*Use uneaten (or clearance priced) chocolate bunnies, hearts, etc as dipping chocolate.
*Sour milk can be still be used for cooking/baking.
*Use brownie, cake, pie crumbs for ice cream topping.
*Soften hard marshmallows by placing in a re-sealable bag with a few slices of fresh bread.
*Save butter wrappers to grease pans.
*Egg whites (uncooked) can be frozen for use later on.
*Freeze things before they go bad.
Half the amount of meat called for in most recipes. Cheaper and less calories!
Don’t serve seconds on meat, juice & milk. Use bread, rice, pasta as fillers if still hungry and drink water for refills.
Don’t serve your entire roast. First set aside amount needed for planned leftovers or to use in other recipes.
Cut your meat into smaller pieces. It will go further in stews, soups, casseroles, etc.
Drink Water.
Try to cut out the non-essentials. (do a little at a time so you don’t feel deprived)
Get organized. Know what’s on hand. Don’t let food go bad in your fridge or pantry.
Educate yourself. If you don’t know how to cook, then learn! Practice makes perfect.
Shop the edges of the store. Everything you need should be in produce, dairy, meat and sales. Everything else will cost you extra.
Shop around for the best deals. Try to plan your shopping with other errands in the area.
Buy direct from the manufacturer things that you use often. (if it’s a better deal)
Try store brands.
Don’t buy an item just because it’s on sale or to use a coupon.
No matter how good the deal is on soda, chips, etc, you still didn’t need to buy them in the first place!
Shop sales and bulk and stock up. (pay attention, make sure you’re really getting a deal)
Plan all your shopping in one or two trips to the store. This helps cut down on impulse buys.
Eat only what you need.
Wednesday, June 30, 2010
Sunday, June 27, 2010
Bountiful Basket & storing fruit and vegetables

I picked up my second Bountiful Basket on Saturday and I'm really glad that I did! I don't know if it was just me, but it seemed like there was more produce in the baskets this time which is always great. My 21-month-old dug right into the juicy strawberries that were included. The only problem that I had is that I still had produce leftover from last week (from the basket and from the store) so I had a hard time finding places for everything. I made a list of everything that I'll make this week and made sure to re-package or freeze those veggies that I won't be able to get to. We certainly can't have anything spoiling in the refrigerator!

The only fruit that I froze were the grapes. We have lots of fruit that needs to be eaten, and if I left it up to my kids they would eat nothing but grapes. So freezing the grapes will help encourage them to eat some of the other fruit before it goes bad. Also, frozen grapes are SO good on a hot summer day. So not only will they not go bad, they will serve as a tasty treat down the road. To freeze, wash thoroughly and drain as much as possible. You can freeze them on a cookie sheet then transfer to freezer bags. But I've found that as long as there's not excess water on the grapes, they freeze just fine if you put them straight into bags. Just squeeze the frozen grapes gently to break apart when serving.

In my basket this week I got onions, celery and carrots.. all of which I either bought last week, or in the case of the carrots, have been using out of the garden. So to make sure these stay fresh, I chopped and blanched the mixed veggies and added them to quart-sized bags for some easy soup or stew down the road. Even if I don't get to them until the end of Summer or beginning of Fall they will be just fine.

First, I set a pot of water to boil. I then chopped the celery and added it to the water with the exception of the celery tops and yellowish inner stalks. These don't take as long to cook, so I set those aside to add last. Next I chopped the carrots and added them. Then I cut the onions into chunks and added them as well. By the time I added the celery tops, I only needed to let the vegetables boil for about 1-2 minutes more. I'm not trying to fully cook them, just give them a good blanching. To stop the cooking process, when I removed the vegetables from the boiling water, I gave them a good dip in some ice water and then into the freezer bags.


I also had some spinach that needed to be frozen. I kept some out for the dinners that I'll make with it this week, but for the rest I wilted it and stuck it into a freezer bag for future use. I stuffed the spinach into a large colander set atop a big empty pot. Then I slowly poured the boiling vegetable broth from the carrots and celery over the spinach and allowed it to wilt for a couple minutes. It was then ready to add to the freezer bags.

For the lettuce and celery that I won't get to until later this week or next week, I wrapped them in aluminum foil to keep them crisp until I'll need them. This really works and is especially handy when the vegetable crisper is full, like mine is. I've kept celery this way up to a month without it going limp on me.

Simply center the vegetable in the foil and wrap tightly.

Other than that just be sure that you keep most vegetables in a high moisture vegetable crisper. And fruits, such as apples and oranges need as little moisture as possible to stay fresh.
"Outside In" Burgers aka Juicy Lucy

Again, it was too hot to cook inside yesterday. I asked the boys what we should grill: "Hamburgers. Like the ones on Man Vs. Food." Ok, so I'm thinking I can do that. I'll just grill me up a turkey burger to go along with dinner so I don't feel too deprived when all the boys are scarfing down Juicy Lucys... um, yeah.. that totally didn't happen. One look at those burgers coming off the grill and I couldn't help myself! There never was a turkey burger that was as juicy and delicious as these babies! One day of fattening food isn't going to ruin everything... right?
"Outside In" Burgers
2 lb ground chuck
1/4 cup chicken broth (I used vegetable broth from the veggies I cooked earlier that day)
1/4 cup fine bread crumbs
1 tsp salt
1/2 tsp pepper
4 oz American cheese
Mix ground beef with broth, bread crumbs and seasonings until well combined. Shape into 8 patties. Pile 1/2 oz cheese on top of each burger.

Shape meat around cheese, fully enclosing cheese inside of burgers. Preheat grill to 500 F. Brush cooking grates clean. Grill 8-10 minutes, flipping burgers once when they come away easily from the cooking grates. During last minute of grilling, toast buns if desired.
Mike wanted bacon on top of his burger, so we added some bacon to the grill as well. This, in my opinion, is the best way to cook bacon seeing as it doesn't force everybody in the house to smell bacon for the next 24 hours.


Here's Mike's partially eaten burger.. so messy he should be eating it with a fork (which he didn't, of course). He topped it with bacon, lettuce, tomato, bleu cheese dressing, ketchup, mustard and salsa. Yum! Mike tells me this concoction was a total of only 80 calories... right...

And lastly, a close up of the cheese oozing out of the center of the burger.
Saturday, June 26, 2010
Gilled Pizzas

Grilled Pizza
1/2 recipe One Hour White Bread
2 8 oz cans tomato sauce
4 cups chopped vegetables of your choice
we used: tomatoes, peppers, onions, pineapple, mushrooms
2 cups chopped or sliced cooked meat
we used: 1 cup sliced linguica, 1 cup diced turkey sausage
4 cups shredded mozzarella cheese
After the mixing and kneading stage of the One Hour bread recipe, move dough to a greased bowl (turning to coat all sides), cover and allow to rise for 25 minutes. When dough has doubled in size, cut the dough into 8 equal pieces. Lightly brush 8 squares of parchment paper with oil. (I didn't have any parchment paper, so I used freezer paper just to easily move my uncooked crusts around). Using your fingers or a small roller, flatten each piece of dough on a sheet of parchment paper to create 8 rounds. Each round should be about 1/3 in. thick. Lightly brush the tops with oil. Let the rounds sit at room temperature 5-10 minutes.


Spread the sauce evenly over the crusts, keeping it from the edges, and then arrange vegetables on top. Top with shredded cheese. Return pizzas to grill and cook, with lid closed as much as possible, until the cheese is melted and the bottom of the crusts are crisp, 2-5 minutes. Rotate pizzas occasionally for even cooking. Transfer to a cutting board and cut into wedges. Serve warm.

Lamb Meatballs, Fruit & Spinach Salad, Kabobs
I am getting so wussy in my old age. It's been so HOT in my house and the outside temps are only in the low 90's as of yet. Either way, the thought of turning on my oven is just about unbearable so we've been grilling the past few nights. I've enjoyed coming up with some different things to cook on the grill- afterall, we can't have steak and hamburgers every night that it's too hot to cook indoors. 

In the process of cleaning out my freezer I found some lamb meat that I bought late last year on clearance and with a coupon. It came out to $1.50/lb so I figured it was worth a shot at that price. But, in all this time I've never known what to do with it. The other night I decided to turn it into some grilled meatballs.

Lamb Meatballs
2 lbs ground lamb
1 Tbsp. minced garlic
1 Tbsp. ground cumin
1 tsp kosher salt
1 tsp ground black pepper
olive oil
In a medium bowl, using yuor hands, gently mix the meatball ingredients. Do not overwork the mixture (like I did! I mixed the meat in a plastic bag so I wouldn't have to touch it, but I ended up over-working it that way...) or the meatballs will be tough. Makes about 25 meatballs Thread 5 meatballs onto each skewer. Lightly brush with oil. Pre-heat grill to about 400 F. Brush the cooking grates clean. Grill the meatballs with the lid closed as much as possible until they have browned but are still slightly pink in the center, 4-6 minutes, turning occasionally.
I also bought a pineapple and some peppers last Saturday at Costco that needed to be used. So, to go along with our meatballs, I made some pineapple/veggie kabobs and some Fruit & Spinach salad.

Fruit & Vegetable Kabobs
1/2 large onion
3-4 cups fresh pineapple chunks (1/2 pineapple)
1 red bell pepper, cut into chunks
1 orange bell pepper, cut into chunks
8 oz button mushrooms
2 cups tomatoes, cut into large chunks
or 18 plum tomatoes
If using bamboo instead of metal skewers be sure to soak them in water for at least 30 minutes. Thread vegetables onto skewers. Keep the vegetables close enough to just touch, without crowding. Brush with olive oil. Preheat grill to 400 F. Brush cooking grates clean. Grill with the lid closed as much as possible until skins of the vegetables begin to brown and blister - about 8 minutes- turning occasionally.
My last edition to our meal was an afterthought. I just wanted to use the extra pineapple and onions that didn't fit onto the kabobs, but it turned out really great! I made a Fruit and Spinach salad with Sesame Vinaigrette

1/2 lb baby spinach
4 oz sliced strawberries
1 cup pineapple, cut into bite-sized pieces (if using canned, reserve the juice)
1/2 cup onion, cut into small chunks
1/4 cup chopped walnuts (optional)
1/2 cup Sesame Vinaigrette
Combine salad ingredients. Toss with Sesame Vinaigrette. Refrigerate at least 30 minutes to combine flavors.
Sesame Vinaigrette
4 teaspoons sesame seeds, toasted*
2 tablespoon rice vinegar
6 tablespoons unsweetened white grape juice (or use the reserved pineapple juice)
4 teaspoons sesame oil
Combine ingredients in a small jar. Shake to combine. Allow to sit for several hours if possible to combine flavors. Shake again before serving.
*I didn't have any sesame seeds, so I made my dressing without them and it still tasted great.
Overall, my opinion about lamb? I think I'll stick with ground beef and turkey. The guys seemed to like them (we only ended up with 4 leftover meatballs) but, while they were good, they don't top my list of favorites. Maybe it's because I kept conjuring images of a cute little fuzzy creature bleating and crying or maybe just because I overworked the meat and the meatballs turned out a bit tough. But at least now I can say I've tried cooking it, right?
Thursday, June 24, 2010
Whole Grain Tortillas
Remember the multi-grain baking mix I made a few days ago? Well, I used that to make these multi-grain tortillas. My standard tortilla recipe is great for flour tortillas but I've found that when I use whole wheat instead of white flour for that recipe, the tortillas turn out a bit bland. This recipe solves the problem.
Whole Grain Tortillas
1 cup whole wheat flour, finely ground
1 cup multi-grain baking mix
1/2 cup water
In a medium sized bowl, combine 1/2 cups flour, baking mix and water. Add enough remaining flour to make a stiff dough. Sprinkle some flour on a clean surface and knead until dough is smooth and elastic. Return dough to bowl and let rest 30 minutes. After dough has rested, shape into 8 balls and roll out flat and thin (about 1/8 inch). Cook on hot griddle about 15 seconds, flip and cook 5-10 seconds more.


Vegetarian fajitas

My diet has been going well. So far I've lost the 3 of the extra 4 pounds I gained last month. And also I haven't spent very much of my grocery budget. I'm thinking maybe I'll be able to stay under my $250 afterall. I've been using some of the extra food that I cooked last month. For example, I used my veggie burgers in my vegetarian fajitas I cooked last night as well as a bell pepper that my neighbor paid me back with. (I gave her a pepper last month so she brought one to me this month!) The cilantro came from my garden. Also the ingredients for the tortillas and the sauce all came from my pantry so the only groceries I used that I had to buy this month were the onions and tomatoes.
Fajitas
1 1/2 large bell pepper sliced thin
1 large onion sliced thin
1 Tbsp chili powder
1 Tbsp ground cumin
1 tsp salt
1 tsp paprika
1 tsp oregano
1 minced garlic clove
2-3 veggie burger patties, sliced
1 Tbsp olive oil
1 tomato, diced
Add olive oil to large fry-pan. Allow to heat to medium hot. Add pepper and onion.You can add 1/4 cup water if needed to keep vegetables from sticking to the pan. When onions are tender add tomatoes and seasonings. Allow mixture to boil about 5 minutes for sauce to thicken. Add sliced veggie burgers last and stir just until warmed. Serve over warm tortillas. Garnish with chopped lettuce, cilantro, fresh tomato, cheese, salsa and sour cream if desired.

Sliced veggie burger- ready to add to the vegetables and seasonings.
Wednesday, June 23, 2010
A little bit of Q & A
I was so excited to get an email from a reader today that I just had to make a post about it. She asked such good questions that I figured I'd share with everybody!
Q: Where are you buying your brown rice?
A: I've found the best deal on brown rice is when Macy's does their case-lot/food storage sales. Usually in April and September. Also Costco carries brown rice in 25lb bags for a reasonable price (WAY cheaper than the small bags at the grocery store). They don't offer it at the LDS Cannery- it doesn't keep as long as the white rice so is not considered "long-term storage," however; I've kept it in my storage for at least up to a year and it has been fine so I try to keep at least one extra 25lb bag on hand as I can easily rotate that amount in one year.
Q: How many servings do your meals typically make? Do you usually make extra for your husband to take to work?
A: I used to always make extra servings when I make dinner because I'd almost always send leftovers with Mike to work. He's since changed jobs though, and no longer has an office where he can re-heat food so I've been packing him cold food instead like sandwiches, wraps and cold soups. Now I make extra servings because my girls and I will usually eat them for lunch throughout the week instead. My meals usually serve at least 8 people.
Q: How are you liking Bountiful Baskets?
A: I've actually just started with Bountiful Baskets (just one so far and another one ordered) but so far I've liked it. It's like getting all your produce on sale. It's also fun to get items in your basket that aren't normally on my list. I've been able to buy more produce for the price of the basket at times depending on what's on sale. The easiest way to get the best deals on produce is to try to price match at Walmart all the other ads.. The disadvantage to that, though, is that you're buying produce from Walmart which isn't always very good. I've noticed that Buy-Low market in Provo/Orem area has good deals on produce frequently as does the Sunflower Farmer's Market store (if that name is right.. it's the store across the street from University mall- used to be an electronics store) But overall, Bountiful baskets is a good buy- just not always the best buy so I like to wait until the ads come out on Tuesday before I place my order (which means sometimes I miss it!). Another good way to get cheap produce is to check out some local U-pick locations. Also check KSL (or your local classifieds) because people often sell or even give away surplus from their gardens or fruit and nut trees. Last year I bottled dozens of quarts of apples that I got for $.10 per pound from somebody on KSL. I've also found peaches, walnuts, pears and more.
Q: When you started this how much did you actually have in stock in your home? For example, did you already have all of your spices? Did you have a basic supply of flour, sugar, yeast ect?
A: When I started trying to build our food storage and decrease our grocery budget we had virtually no food storage other than some basic pantry items like a couple 5 lb bags of flour, sugar, etc. I was buying yeast in packets as needed (ugh!) but I did have a pretty big supply of spices because I have always loved making my own sauces and seasoning my own food just the way I like it. The nice thing about spices is that a little bit goes a long way. They can be expensive when you are first building your supply but most spices will last for YEARS and you only have to use a little bit at a time. I usually only have to buy additional spices once every couple of months. The ones I use the most are probably basil and cumin so I try to buy those in the biggest volume that I can afford. (Mexican markets usually have the best deals on cumin in bulk- you can also try some online sources like bulkfoods.com)
Also- For the first few months when I started changing things, I cut our food budget from $800/month to $450. I spent $350 on our groceries and set aside $100 every month to build up our food storage. As I got better at budgeting, meal planning and cooking I gradually reduced that amount to what I'm at now. It didn't, by any means, happen over night. We probably would have starved! :) My normal grocery budget (including soap, cleaners, diapers, and food plus restocking our food storage) is pretty steady now at $250/month. Some months I may spend a little bit more (like this month- trying to diet and buy diapers on $250 might be pushing it a bit- but we'll see how it goes) and some months I have only had to buy eggs and milk so it's significantly less than that.
Q: Are you making one grocery trip a month or several?
A: I usually have one big shopping day per month. Usually on or near payday. This is when I buy the bulk of our food that we'll need during the month. I come home and freeze meat and vegetables in meal-sized portions so they won't go to waste waiting for me to cook everything. I add a second trip to the store about halfway through the month for more fresh produce, eggs and milk. If you buy your milk fresh, it should last about 2 1/2 weeks in the refrigerator so just buy enough to last you for that amount of time. Some stores seem to have fresher milk than others. Costco usually has at least a couple weeks on their sell-by dates as does our local Smith's market here in Saratoga Springs; however Walmart and some Associated stores often only have a few days to a week. Eggs should last through the month, but I buy them twice because I can't fit a month's worth into the fridge!
Q: How often are you eating vegetarian meals?
A: I usually make at least one vegetarian meal per week. I'm not a big meat eater, so I'd actually prefer to eat them more often, but my husband is a meat and potatoes kind of guy- He actually accuses me of trying to starve him if I don't feed him meat! Often, I add meat just for him and my son so I seldom use more than 3/4 pound of meat per meal. Some vegetarian meals that he doesn't mind: Macaroni and Cheese, Garden Vegetable Minestrone, Pastafazool (this can be made with or without meat easily) and tonight I actually made Vegetarian fajitas and he didn't even notice there was no meat! At least he didn't say anything about it and he had a second helping. The only thing he asked about was the cheese.

This is a snapshot of my spice cabinet. As you can see, a simple spice rack just doesn't cut it for me! I have just about every common spice and a few uncommon ones as well. The picture really doesn't even do it justice.
Please, if anybody else has comments or questions, feel free to email me at mikeandsheryl@q.com
Thanks!
Chicken and Snow Pea Stir-fry

Chicken and Snow Pea Stir-fry
1 lb chicken, sliced thinly into strips
1 onion, sliced
1 lb Snow Peas
1 cup baby carrots, sliced
1 Tbsp olive oil
1 tsp Mrs. Dash type seasoning
1/4 cup soy sauce or Miso
4 cups brown rice, cooked
Heat oil in a large skillet or wok. Add chicken a few batches at a time and brown thoroughly. To get a nice browning, you don't want to crowd pan. When chicken is cooked through, add vegetables and stir-fry until tender-crisp and vibrant in color. Do not overcook. Add seasoning and Miso adding Miso 1 Tbsp at a time to desired taste. Serve over brown rice or mix rice into chicken mixture.
Just a note: The peas and carrots both came from my garden! I'm so excited to start harvesting things. I've got a long ways to go for my tomatoes, but even my peppers have started producing! Last night I also harvested several bunches of cilantro. I'll use some this week, but the rest will be chopped up and put into the freezer for salsa when my tomatoes and onions are ready.
Finger Paints, Face Paint, Play Dough
While Mike and Josh were camping last week I had a fun time with the girls coming up with things to do for "girls week" as Savanna dubbed it. I experimented with a few fun recipes to keep us all busy.
Finger Paints
1/4 cup cornstarch
2 cups water
Mix in saucepan and boil until thickened. Pour into a jar. Add food coloring until the desired shade is achieved. Store covered in the refrigerator.
Face Paint
1 tsp corn starch
1/2 tsp water
1/2 tsp cold cream
food coloring
Mix all ingredients together in an old muffin pan or small cups and you are ready to paint. This amount is for each color. I like to let the girls "paint" themselves just before bathtime.
Play dough
2 cups flour
1 cup salt
1 tsp cream of tartar
2 Tbsp. oil
2 cups water
 Mix together all ingredients in a saucepan. Cook over medium heat, stirring constantly until mixture gathers on the spoon and forms dough (about 5 minutes).
 Don't worry if the dough is lumpy and rough looking, it will smooth out when you knead it. Remove from pan and allow to cool enough to handle then knead until pliable.
 Store in covered container or plastic bag. To make different colors, divide dough into sections. Make a well in the center of each piece and drop food coloring in the center. Knead dough to mix color in thoroughly.
 *For a more vibrant red, I like to dump a packet of unsweetened cherry drink mix into the center instead of food coloring.
Finger Paints
1/4 cup cornstarch
2 cups water
Mix in saucepan and boil until thickened. Pour into a jar. Add food coloring until the desired shade is achieved. Store covered in the refrigerator.
Face Paint
1 tsp corn starch
1/2 tsp water
1/2 tsp cold cream
food coloring
Mix all ingredients together in an old muffin pan or small cups and you are ready to paint. This amount is for each color. I like to let the girls "paint" themselves just before bathtime.
Play dough
2 cups flour
1 cup salt
1 tsp cream of tartar
2 Tbsp. oil
2 cups water


Monday, June 21, 2010
Tuna Salad

Tuna Salad
1 5 oz can tuna in water, drained
2 cups chopped fresh spinach
1/3 cup diced onion
1 hard cooked egg
2 tsp mustard
1 Tbsp olive oil

Combine tuna, spinach, egg and onion. Mix together mustard and olive oil then drizzle over salad. Mix thoroughly. Serve as a sandwich with a slice of mozzarella or eat as a salad.
Multi-grain Baking Mix, Waffles and Bread

I turned about 7 cups of it into some delicious multi-grain bread. No white flour, no white sugar!

7 cups multi-grain flour (or whole wheat)
2 Tbsp Saf-Instant Yeast
2 tsp salt
1/4 cup honey
2 cups warm milk
1 Tbsp vinegar
1/2 cup olive oil
 Combine 3 cups flour, yeast and salt in a large mixing bowl. Add warm milk, honey, oil and vinegar and stir well. The mix will be about the consistency of cake batter. Allow to sit for about 5 minutes. Add 3 more cups flour and stir until incorporated. Dough should be pulling from sides of the bowl. Turn dough out onto clean, floured or oiled surface and knead, adding additional flour as necessary until dough is smooth and elastic. (I seldom, if ever, use the entire last cup.) Cover dough with a towel and allow to rest 5-10 minutes. Knead an additional 5 minutes then return dough to greased bowl. Let rise until doubled in size - about 45 minutes. Grease two loaf pans and sprinkle with coursely ground cornmeal. Shape dough into two loaf pans. Cover and let rise until doubled. Bake at 375 for 30 minutes.
Multi-grain Baking Mix
4 cups multi-grain flour
2 Tbsp baking powder
1 1/2 tsp salt
2/3 cup nonfat dry milkd powder
1/3 cup olive oil
In a large bowl combine dry ingredients. Drizzle oil over dry mixture; cut in with pastry blender, electric mixer or your fingers until it resembles coarse cornmeal. Store in covered container in refrigerator.

Multi-grain Waffles
2 cups Mg Baking mix
1 cup water
2 egg whites*
2 Tbsp honey
1 Tbsp oil
Combine dry ingredients in a medium mixing bowl.

Push dry ingredients to the sides of the bowl, making a well in the center.
In a 2 cup measuring cup add wet ingredients except egg whites and mix thoroughly. Pour into the well and stir until moistened.

In a small bowl whisk egg whites briskly until soft peaks form. Carefully fold egg whites into waffle batter. Bake in a pre-heated waffle.

As the saying goes, "a picture is worth a thousand words." But I wish there were a way for me to let you all taste these waffles! Most people who don't like whole grain foods cite the density as their turnoff. These waffles, on the other hand, are so soft and light, moist and delicious. The trick is beating the egg whites seperately and folding it into the batter. Yum!
*You can substitute one whole egg, seperated. Add the yolk to the wet ingredients and beat the white as previously stated.
If I didn't change the rules...
If I didn't change the rules and I were still trying to build up my food storage and keep my grocery budget low, this is what my shopping list would have looked like:

But while I am still trying to keep my bill at $250 or under, I'm actually going to use my food storage this month to make things work. I'm starting my diet today so I've changed quite a bit about my grocery list this month. I'm hoping to be able to drop the extra weight I gained last month and still have fun cooking. I really hate dieting so I'm trying to keep this as simple and fun as possible. Some areas I have the most problems with are too many sweets and too much cheese. So for the first 10 days (at least) I'm trying to completely cut those things out and we'll go from there. I've made my menu and my new shopping list. I even went shopping on Saturday to get things started. This is my rough grocery list for this month:

The produce will vary depending on what actually comes in the bountiful baskets that I get. I picked up my first basket on Saturday morning and was happy with what I got and am looking forward to trying it again. I'm also hoping my garden starts producing more by the end of this month which will also really help out with the produce that I plan to buy. I'll be sprouting my own seeds this month as well.
I started my prep cooking Saturday afternoon for my healthy meals this month. I started with some multi-grain flour. (Yes, I broke down and bought a new wheat grinder... ) For my flour I used 5 cups hard white wheat, 1 cup soft white wheat (the last that I had in my storage) 1 cup oat groats and 3 cups rye groats (again- the last I had so I need to buy some more). I then used that flour to make a whole-grain baking mix that I'll use for things like waffles, pita, and tortillas. I also made some multi-grain bread which turned out delicious. I will post all these recipes on a later post.
Sunday, June 20, 2010
Fried Rice, Eggs Fu-Yung, More Smoothies

The boys are back in town! I had grand plans of preparing amazing rice and vegetable dinners while they were gone but turns out we went super simple instead. I did do some cooking (like homestyle MacNcheese, Veggie burgers, gnocci, fried rice and eggs fu-yung) but for the most part we ate leftovers (like stir-fry from the freezer that I cooked earlier this month) and LOTS of smoothies. In fact, it seemed like every other meal last week was in smoothie form. And I did serve granola for dinner... but just once and it was on the last day of my week without the boys.
Here are a few of the smoothies that we had:
Orange Cream Smoothie
1 orange, peeled and segmented
1 cup orange juice
1 cup crushed ice
1 cup water
1/2 cup plain yogurt
1/2 tsp vanilla
2 Tbsp honey3 Tbsp dry milk powder
Strawberry Yogurt Smoothie
1/2 cup fresh strawberries (one of my neighbors shared her harvest with me!)
3 Tbsp dry milk powder
1 cup crushed ice
1 Tbsp flaxseeds
1/2 cup plain yogurt
Spinach Berry Smoothie
1/2 cup fresh strawberries
1 cup frozen blueberries
2 cups orange juice
2 cups spinach greens
2 Tbsp. honey
Add ingredients to blender putting softest ingredients (like fresh berries) in first. Pour liquid in last. Blend until smooth.
Last week we also had Eggs Fu-yung using some of the stir-fried vegetables I had in the freezer. There's no picture on this one as I used up my camera battery on one of our fun outings! Eggs Fu-Yung is another meal my dad used to make when I was a kid. It's an awesome way to make a meal out of leftover Chinese food.
Eggs Fu-Yung
Sauce
1 cup Chicken Broth
2 Tbsp Soy sauce
1 Tbsp Cornstarch
1/4 cup water
Egg Mixture
6 eggs
4 cups cooked stir fried vegetables
like onions, sliced, bean sprouts, mushrooms, broccoli, cauliflower
2 Tbsp olive oil
Mix broth and soy sauce. Heat to boiling. Mix cornstarch and water. Stir slowly into the broth. Cook, stirring constantly, until thickened. Keep warm while cooking egg mixture. Beat eggs until very thick and light. Fold in vegetables. Heat oil in frypan over moderate heat. Pour egg mixture by 1/2 cupfuls uinto the pan. cook until lightly browned on one side; turn and brown the other side. Serve sauce over the patties.
Egg Fried Rice
2 cups cooked brown rice
3 eggs
1 cup chopped vegetables (I used snap peas from the garden and diced zucchini from the freezer- you can also use carrots, onions, etc)
1/4 cup light soy sauce or Miso
1 tsp Mrs. Dash type seasoning
1 Tbsp olive oil
Heat oil over moderate heat in a large fry-pan. Add rice and vegetables. Stir-fry until vegetables are tender-crisp, about 5 minutes. Push rice to the side leaving center of pan open.

Crack eggs into center of pan and allow to cook until set.
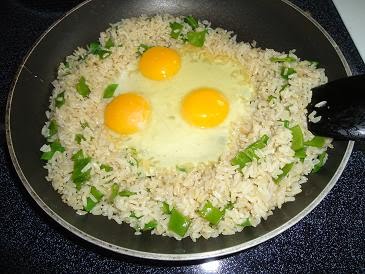
Scramble the eggs in the center of the pan. When eggs are cooked, mix with the rice and add seasoning and soy sauce, adding soy sauce 1 Tbsp at a time (up to 4 Tbsp) to taste.
Friday, June 18, 2010
Payday & The New Plan
A word to the wise... don't update your blog while you have a squirmy baby on your lap. I just spent the last 20 minutes typing out my new awesome plan as well as an update of how this last month went when my cute little Marsa deleted everything I had written with one quick keystroke.. still not sure what she pushed. To my horror... "Draft saved" immediately after her clever little trick. Arrgh! Ah well, here we go again... (This time I’m typing it out on Word first.. Copy & Paste for the win!)
Today is payday and overall I think we did pretty good this last month. With our $250 budget we were able to eat well (too well!) and my freezer and pantry are more full than when I started. My refrigerator as usual is not. We've been out of milk for almost a week which is no big deal since the boys have been camping and the girls and I enjoy rice milk anyway. We've also been out of lettuce (sort of) but I've been growing sprouts for a substitute. (I actually have loads of lettuce in the garden, but it's infested with tiny little green bugs. They haven't damaged the lettuce {yet} but I hate hate hate bugs and I'm not willing to spend an hour washing, washing, washing & RE-washing lettuce for a salad. I know.. Pathetic.. But we have been enjoying peas, carrots, and spinach from the garden.) I was able to add to our long-term storage and I even have several dinners, breakfasts and snacks in the freezer for next month that we didn’t end up using.
The Plan:
So I’ve decided to continue my silly little blog this month, but with some changes. First off, the time limitations are GONE. I’ll admit it’s been tough limiting my cooking hours. Tough, but do-able. I kept track of my cooking time and found that I spent about the same amount of time cooking last month as I usually do- which is about 1-2 hours per day. Not too bad, but I really like doing my cooking in the morning versus night. Also, I’ll be dipping into my food storage this month. This will allow me to demonstrate my normal cooking and shopping. I’ll still be adding to my food storage as well of course. And lastly… Remember how I said we’ve been eating too well? Well, turns out I’ve been having so much fun baking and taking pictures of food … and eating it… that I gained FOUR pounds last month. Which doesn’t help when I’m still trying to lose the baby weight... from my last two kids... (Yes, I realize that’s not a valid excuse anymore, but that’s not going to stop me from using it!) So lastly, next month you are all going to join me on my diet.
The diet:
I've sorted through my recipes and am choosing out the most healthy and delicious ones possible for next month's menu. It's a bit of a challenge because, as it turns out, I really like sugar. And butter. And cheese. And chocolate... ok moving on! I'm going to try to eat more fresh vegetables and more whole grains. For the first couple of weeks I will try to cut out sugars, etc. And just so you know- I really hate dieting. So expect me to try to dress things up as much as possible. Celery is just not as photogenic as cinnamon rolls... so there may be less pictures! So for now, here are some of my favorite "diet" recipes that I'll probably try this month.
Dinner: Chicken & Snow Pea Stir-fry, Blackened Salmon, Chicken Burritos, Chicken Curry, Hawaiian Chicken Kebabs, Turkey Burgers, Veggie Burgers, Oriental Bbq Chicken, Poached Chicken, Fajitas, Turkey Meatloaf
Lunch: Roast Beef Reuben Sandwiches, Tuna Salad, Protein Berry Smoothies, Turkey Sandwich w/sprouts, Turkey & avocado Wrap, Chicken Pita, Turkey & hummus pita, Chicken Salad
Breakfast: Granola, Berry Smoothie, Multigrain Waffles/Pancakes, Turkey sausage, Egg white omelets, Cottage cheese and fruit
Snacks: Baked chips with Mock Guac, Celery with peanut butter, Smoothies, Almonds, Frozen Yogurt, Pita Chips and salsa
I haven't made my shopping list yet, but most likely the bulk of my budget this month will be spent on fresh fruits and vegetables. I usually spend a big chunk of my budget on dairy which hopefully I'll be able to cut. That'll be tough.. I LOVE cheese! I wish I were more enthusiastic about this... but I really do hate dieting and I'm not very good at it (obviously!). So any hints, tips and/or recipes would be VERY welcome. You can email me at mikeandsheryl@q.com or just leave me a comment! :)
Thursday, June 17, 2010
Gnocci

Gnocci
1 cup mashed potatoes* (I had 1 1/2 cups leftover from Sunday dinner so that's what I used)
1 egg, beaten
1 teaspoon salt
1/2 tsp ground nutmeg
1/8 teaspoon ground black pepper
1/2 to 1 cup all-purpose flour
Whisk together potatoes, egg, nutmeg, salt, and pepper. Blend in enough flour to make a fairly stiff dough. Turn dough out on a well floured board. Knead lightly. Divide dough in half. Shape each half into a long thin roll, the thickness of a breadstick.

*You can substitute potatoes for 1 cup dry potato flakes and 1 cup boiling water. Place potato flakes in a medium-size bowl. Pour in boiling water; stir until blended. Let cool.
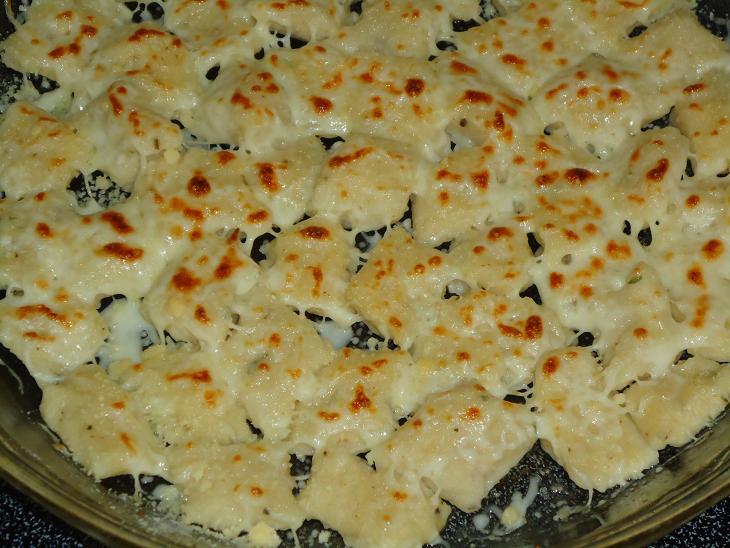
These were SO easy that I decided to experiment a little bit. First off, instead of cooking them with sauce I tried broiling them with cheese on top. Gnocci are so soft and moist they really don't need the sauce anyway. (FYI- be careful not to add too much flour to the dough or they won't be as soft and delicious.) I just laid the Gnocci in a greased pan and shredded some Mozzarella on top. Put them under the broiler on High for 5 minutes until they were golden brown. Yum!
The next thing that I tried (and I'm sure I'm not the first one to have done this) was to substitute the mashed potatoes for cottage cheese. They turned out REALLY good but I'm not sure which one I liked better. They were both pretty tasty. When my garden starts producing I'm going to try subbing in some cooked spinache or steamed zucchini instead of the mashed potatoes. We'll see how it goes!
Subscribe to:
Posts (Atom)